HappyCardFactory Designs

Dream. Create. Inspire.

  • Shop
  • Facebook
  • Pinterest
  • Twitter
  • Instagram
  • Home
  • Our Store
  • Blog
  • Tutorials
  • 3D Projects
    • 3D Crafts
    • 3D Flowers
    • 3D Letters
  • Contact
  • About Me
    • About Me
    • Disclosure
    • Privacy Policy
  • Join Our Group
You are here: Home / Boss Kut Gazelle / Adorable Felt Flower Pin

Adorable Felt Flower Pin

August 27, 2012 by Rebecca Wagner 5 Comments

Long time no see!  I’m  here for the last and final time being part of the Boss Kut Design Team.  I am sad that my term is over.   I have been working with a great company, top to bottom, and some fabulous design team members.  You will all be sorely missed.  This project made me leave my comfort zone once again, and try out a new material – felt.  This is something I have never tried to cut before.  I am pleasantly surprised at how it turned out!

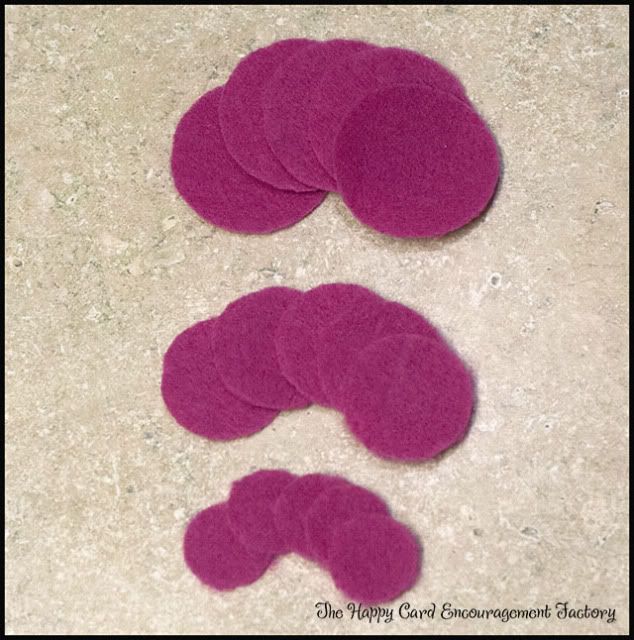
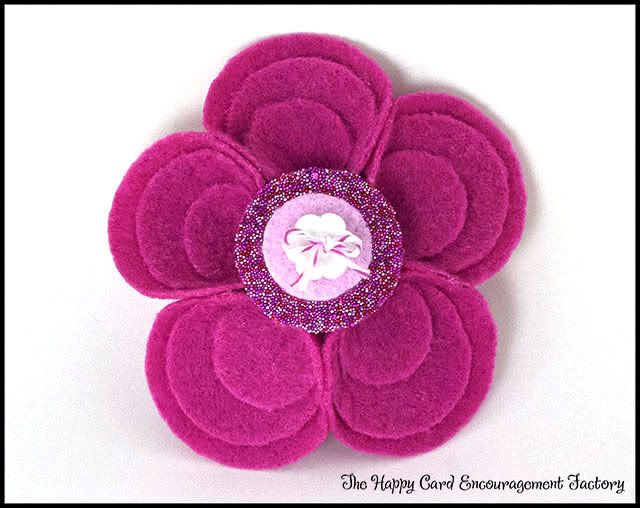
OK, Let’s get to it.  Purchase a sheet of stiffened felt and a pin back from Hobby Lobby or your favorite craft store.  The felt usually comes in a big sheet.  Cut three circles in varying sizes (Five at 2″, five at 1.5″, seven at 1″, and one at half an inch).  That brings us to 17 total circles.  The settings I used on my Gazelle were force 4, speed 3 with the deep cut blade raised to sit higher in the holder by stacking 25 post-its.  This helps the blade not drag over your material, and cause cuts where you don’t want them.  It also helps to “punch” through thicker material to get a better cut.

Let’s make the petals first. Lay aside two of the 1″ along with the half inch circle.  We need to start with five of each of the sizes as shown below.

I used a hot glue gun for this project.  Hence, why it’s a tad messy.  You can use whatever glue you feel will stick the felt together and keep it sturdy.  Glue the 1″ to the 1.5″ then the 1.5″ to the 2″ like this.  I didn’t go all the way to the bottom because I wanted to see the inside petals better when it becomes folded. 


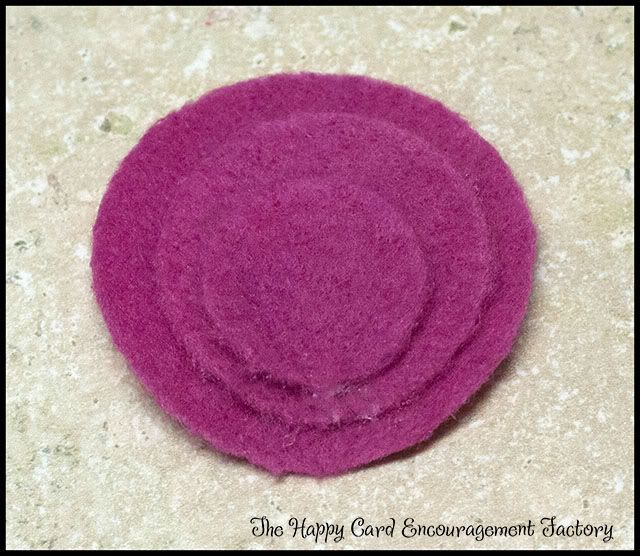
You should now have five petals stacked and glued, ready to be folded over.  Now to form the petal shape. Wrap the bottom half of the petal around your finger or a pencil to get your desired curve.  When you like how it looks, just place a small dab of hot glue inside the fold.  Be careful, the felt is thin and the glue hot.  It gets a little warm holding it.  But the good news is it dries super fast.


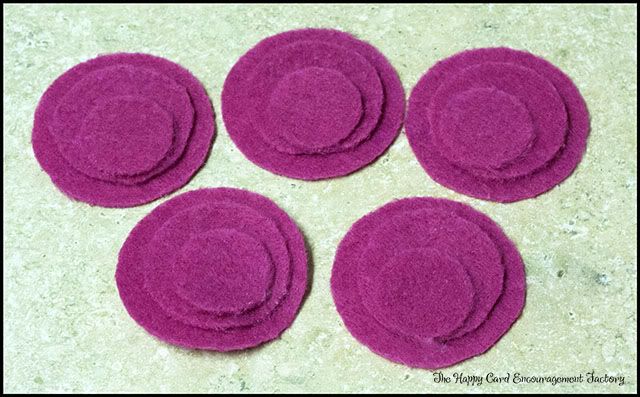
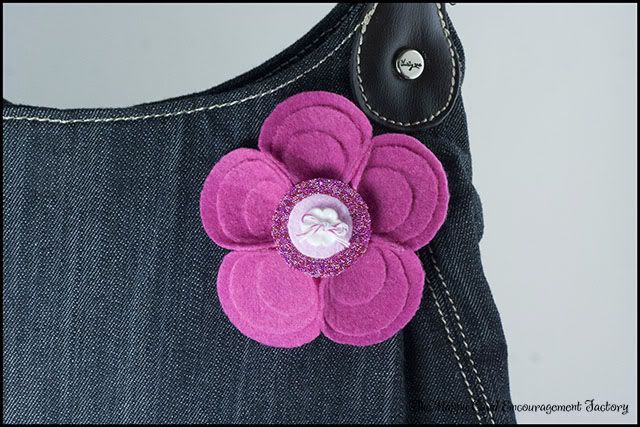
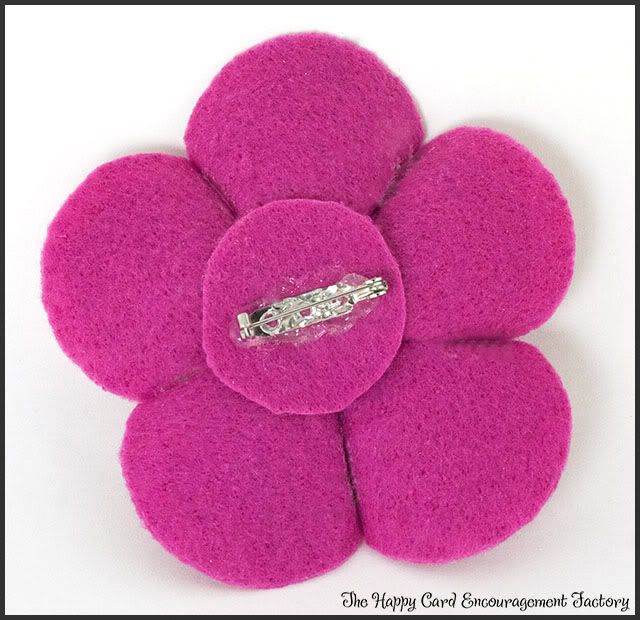
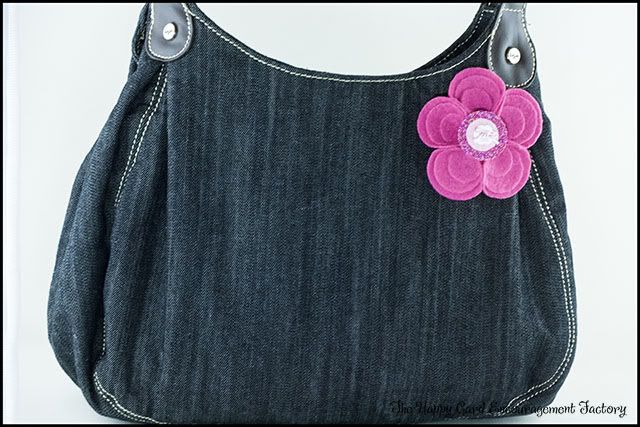
When you are done forming your petals, glue them together in a circular pattern.  You will see the flower shape appear.  Using one of the reserved 1″, glue to the back.  This is a stabilizer so your pin has something to sit on when glued.  You can now glue the pin onto this piece.  Take your other 1″, and glue the half inch on top of it.  The half inch can be the same color or an matching one.  Just something adorable! 


I wanted to add a little style without adding additional bulk.  I choose to glue very fine microbeads around the outer rim.  A simple button with bright, happy twine, and it’s complete.


I normally wouldn’t show the back of any project I make because I am a messy crafter.  I thought you might like to see how I glued the pin.  Just ignore all the glue.  😛
 
 
Here it is in all it’s glory attached to my Fifth Avenue purse in denim by Thirty-One.  Just an adorable accent to go along with my favorite purse.  Since it’s felt, it should hold up really well if it gets banged around.  Especially with all hot glue I solder onto it.  LOL

Filed Under: Boss Kut Gazelle, felt, flower, homemade, pin, Trendy Twine

« You’re Whale-y Great
Life’s a Beach »

Comments

  1. Kate says

    August 27, 2012 at 7:54 am

    So Pretty. I’m sure you will be missed as part of their DT.

    Reply
  2. Merry says

    August 27, 2012 at 9:43 am

    This is really pretty…thanks for the great tutorial. I shall have to give this a go soon.

    Reply
  3. Jann H Schott says

    August 27, 2012 at 7:58 pm

    Very cute!! FWIW, Beacon makes an adhesive that is just like the hot glue consistency but without the heat! It’s called 3-N-1 and it is wonderful. I know Joann’s sells it in their adhesive section. I actually used this to create the cover for my Silhouette SD machine instead of sewing!

    Reply
    • Rebecca Wagner says

      August 29, 2012 at 6:44 pm

      WOW, Jan, great idea! Now I will have to go get some. The hot glue was killer. LOL

      Reply
  4. Rebecca Wagner says

    August 29, 2012 at 6:44 pm

    Thanks for the kind comments. ^__^

    Reply

Leave a Reply Cancel reply

Your email address will not be published. Required fields are marked *

This site uses Akismet to reduce spam. Learn how your comment data is processed.

About the Designer

Hi, I'm Rebecca. I am a child of God. A loving wife of 29 years. A boy mom. A collector of gadgets, gizmos, and superhero action figures. Making the world more organized one planner at a time. Read More…

  • Facebook
  • Instagram
  • Pinterest
  • Twitter

Looking for Something?

Categories

Copyright

You are welcome to feature or share any article, as long as you use only one image and link back to the specific post. You may NOT edit, crop, remove my watermark, or change my images in any way without written permission.

Republishing posts in their entirety is prohibited. If I somehow produce something that inspires you to create your own, please credit me and link back to my site. Thanks!
  • Blog
  • Home
  • Tutorials
  • About Me
  • Contact Me
  • 3D Projects
  • CGP VIP Group

Join us on Instagram

New year, same avoidance habits. January just hits New year, same avoidance habits.
January just hits different when you're still ignoring that thing. At least now it's documented
Sorry, I ramble on here but thought you all would Sorry, I ramble on here but thought you all would want to know. 😌
I tested both options, and honestly, the regular l I tested both options, and honestly, the regular lamination on the tabbed dividers holds up just fine. That means no extra steps and no unnecessary reinforcement. Always happy when the simpler option actually works.
I finished testing, and I'm almost ready to tell y I finished testing, and I'm almost ready to tell you which top tabs work best: reinforced edges on laminate or just our standard divider lamination. 👀
This is my planner for 2026. 
No testing. No “ This is my planner for 2026.

No testing. No “maybe.” This one. 📖✨

6x8 spiral notebook refill, Deluxe Monthly, paired with one of our new romance covers, and yes… it fits perfectly in Coach notebooks. Clean pages, roomy layout, zero chaos energy.

If you’re a monthly planner who wants structure and pretty, this is it.

They’re live now
• On our website under Bound Planners
• And in our Etsy shop

Link in bio. Go romanticize your planning life a little. 💅📆

#citygirlplanners #stationerylove #coachnotebook #6x8notebook #planningtime
Testing top tab durability in our spiral 6x8 noteb Testing top tab durability in our spiral 6x8 notebook.
These are Crimson Luxe top tabs in two versions: one with reinforced holes, one without.

The goal here is simple:
How well do they hold up when you pop them in, move them around, and reposition dividers as needed?

Early takeaway?
These aren’t meant to be shuffled around constantly like a disc planner. This is more of a place-them-with-intention, then let them live there situation.

I’m testing both versions to see what actually holds up in real use, not just what looks good in photos.
More notes once I’ve abused them a little more. 😏

#plannercommunity #plannerdividers #citygirlplanners #plannertabs #stationerylover
Testing these A5 top tabs in the Coach notebook to Testing these A5 top tabs in the Coach notebook to see how they look and fit.

If this works… I may have just solved a problem that’s been living rent-free in my head.

No promises yet, but I’m cautiously optimistic and slightly smug about it. 💅📒✨

#citygirlplanners #plannertabs #planneraccessories #a5planner #a5inserts #ringbinderplanner #plannersofinstagram #stationerylover #plannerdetails #plannernerd #plannerlove #functionalplanning #plannerinspo #plannersetup #plannerlife #luxuryplanner #coachnotebook #lvoeluxury
Sneak peek at the A5 spirals made just for the Coa Sneak peek at the A5 spirals made just for the Coach notebook.
White plastic coil, slim cardboard backing so it slides right into the pocket, and cardstock covers — personalized, not coated.

Alien cover = Monthly Deluxe (with lined pages in back).
Bookshelf cover = Weekly Horizontal Compact.

We did have to cut the deluxe notes section to keep everything on a smaller coil (so the weekly fits), but we’re still testing what else we can add… including a special feature I’m not spilling yet.

Trying to make this thing as functional as humanly possible — stay tuned. 👀✨

#citygirlplanners #a5planner #coachnotebook #plannerrefill #stationerylove #2026planner
Testing something new… 👀 Our A5 Coach noteboo Testing something new… 👀
Our A5 Coach notebook is finally getting the glow-up she deserves, and we’re playing with different refill styles to see what fits, flips, and feels right inside that TikTok-famous cover.

This spiral beauty is one of the contenders — and yes, we’re this close to having the perfect setup. Stay tuned… it’s all coming together. ✨📚

Who else is ready to upgrade their Coach with something way more functional than the paper it came with?

#citygirlplanners #plannerrefill #a5planner #coachnotebook #plannercommunity #a5refill #stationerylove #plannergirl #2026planner #organizedlife #plannersetup #planningessentials #spiralplanner
Follow Us!

Categories

Archives

Copyright © 2026 · HappyCardFactory Designs