HappyCardFactory Designs

Dream. Create. Inspire.

  • Shop
  • Facebook
  • Pinterest
  • Twitter
  • Instagram
  • Home
  • Our Store
  • Blog
  • Tutorials
  • 3D Projects
    • 3D Crafts
    • 3D Flowers
    • 3D Letters
  • Contact
  • About Me
    • About Me
    • Disclosure
    • Privacy Policy
  • Join Our Group
You are here: Home / Consumer Crafts / Wood Tile Coasters

Wood Tile Coasters

July 19, 2012 by Rebecca Wagner 4 Comments

Hi fellow crafters, I’m back again with another fun project.  This time I decided to go with a little gift idea rather than my usual cards.  It’s because I love bringing simple gifts that my hosts will use when my family and I are invited to dinner or a summer BBQ.  Coasters are inexpensive and easy to make.  Believe it or not, coasters are super appreciated and you can never have enough.  Especially when you do a lot of entertaining.  Plus there are so many ways you can make them. So let’s take a look at the supply list for the ones I made above.
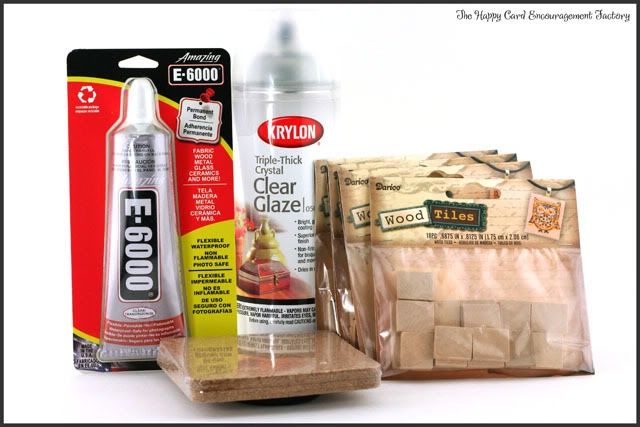
Supplies:

 
  • Krylon Triple-Thick Crystal Clear Glaze
  • 4 packs of Wood Tiles
  • E-6000 glue
  • Cork coasters
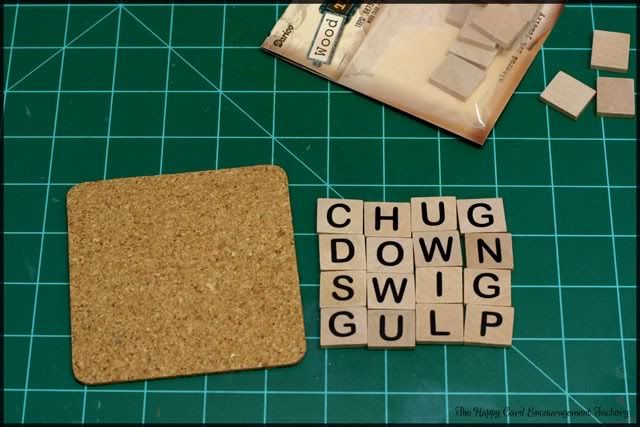
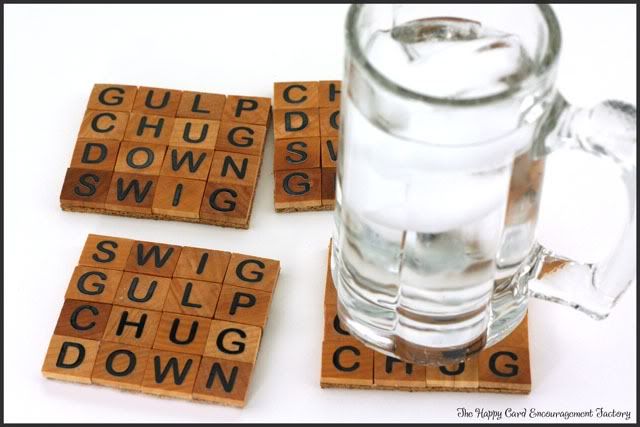
Before you start, decide how big and what your coasters are going to say (if anything at all).  I choose to make them 4 wood tiles wide and 4 down.  I also wanted words that represented drinking.  The great thing about these wood tiles is there are no letters printed on them.  That way it is easier for you to add your own without running out of letters for your project.  I did use a marker to add my letters but I must have had too much caffeine today because my handwriting was terrible.  I found some alphabet stickers laying around and decided it would be easier on everyone if I just used them.  Since I am going to be using a sealant, the stickers will work fine.
 
 
Once you have your tiles all worded up, you are ready to glue them onto the cork.  The cork on the bottom is great as it acts as a stabilizer for the tiles and also a surface protectant.  We wouldn’t want to give a present to someone and have it scratch up their coffee tables, now would we?


Now that all my tiles are glue down together, this gives me the opportunity to make sure I have them lined up correctly.   I also check if I like the placement and then letting them dry for a bit before trimming.
 
 
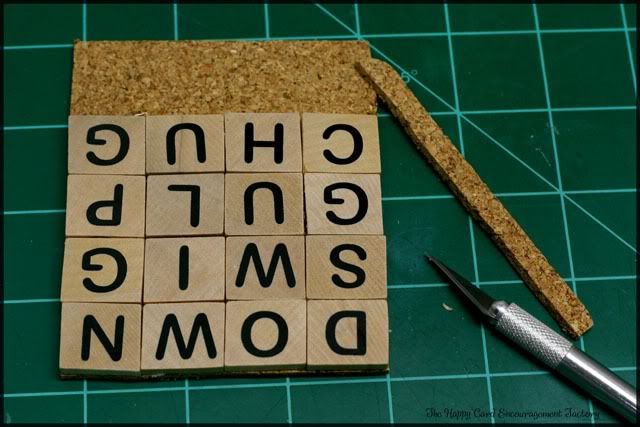
After about 20 minutes, I trimmed as close to the edges as possible with my craft knife.  I made sure the sides looked nice and clean with no crumbs hanging.   Then it was time to seal the wood.  I sprayed one coat with the Krylon Triple-Thick glaze.  The great thing about this glaze is one coat equals three coats, dries to the touch in 15 minutes and can be handled in about 4 hours.  I love the extra high-gloss finish that looks like glass and it gives the illusion of depth to the coasters.  I also love how the glaze darkened the wood.


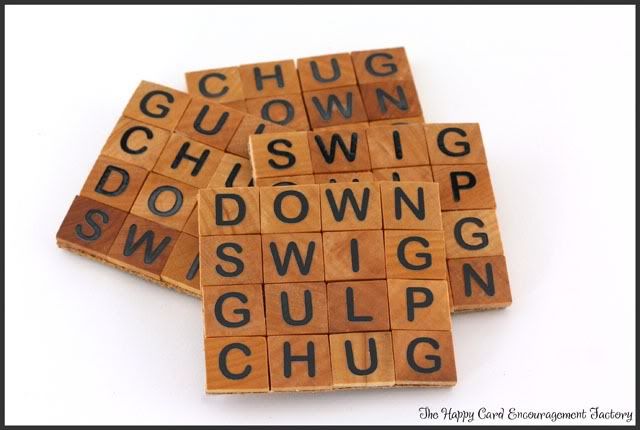
These cute little coasters are just the right size for a mug or glass of Sweet Iced Tea!  Refreshing in those long summer nights!
 
 
That’s all there is to it.  Told you it was simple.  Thanks for stopping by and checking out my guest project for Crafts Unleashed.  Take your time and look around at all the amazing projects they have to offer. There is some serious talent there!  
 
Have a great day and happy crafting!


Filed Under: Consumer Crafts, gift ideas, home decor

« Etched Glass
Digging for Buried Treasure »

Comments

  1. Therese says

    July 19, 2012 at 1:15 pm

    Hi Becki! This is a really cool idea. It’s so neat with the word tiles too. I just made coasters for my mother-in-law for Mother’s Day using tile and felt, lol! BTW, I just nominated you for the versatile blogger award, cause you’re so awesome!

    Reply
  2. Krafthead says

    July 19, 2012 at 3:02 pm

    Great idea using the word tiles on the coasters!

    Reply
  3. Merry says

    July 19, 2012 at 11:53 am

    Such a fantastic idea and thanks for the step by step tutorial.

    Reply
  4. Rebecca Wagner says

    July 20, 2012 at 9:21 pm

    Thank you ladies, I had a great time making these! Therese, you are such a sweetie! Or and you’re even more awesome. 🙂

    Reply

Leave a Reply Cancel reply

Your email address will not be published. Required fields are marked *

This site uses Akismet to reduce spam. Learn how your comment data is processed.

About the Designer

Hi, I'm Rebecca. I am a child of God. A loving wife of 29 years. A boy mom. A collector of gadgets, gizmos, and superhero action figures. Making the world more organized one planner at a time. Read More…

  • Facebook
  • Instagram
  • Pinterest
  • Twitter

Looking for Something?

Categories

Copyright

You are welcome to feature or share any article, as long as you use only one image and link back to the specific post. You may NOT edit, crop, remove my watermark, or change my images in any way without written permission.

Republishing posts in their entirety is prohibited. If I somehow produce something that inspires you to create your own, please credit me and link back to my site. Thanks!
  • Blog
  • Home
  • Tutorials
  • About Me
  • Contact Me
  • 3D Projects
  • CGP VIP Group

Join us on Instagram

Personal Size planners get a bad rap for one reaso Personal Size planners get a bad rap for one reason…

They’re narrow.

And I get it.
Personal is the perfect middle ground. Bigger than Pocket, fits in your purse, but way more portable than A5.

But the width?
That’s always been the complaint.

Lately I’ve been seeing people try to squeeze Personal Wide into standard Personal binders… and then wonder why the pages stick out.

So instead of making it wider… I went the other direction.

Foldouts.

For 2026, I reworked the layout to give you more planning space without changing the footprint.

Month on one page
Straight into your weekly
Dashboard space (because you know I had to keep that)
And when it’s folded?
Standard Personal Size. Fits your binder like it should.

Now I need your opinion before I finalize this…

What works better in vertical boxes?

Graph (left side)
or
Lines (right side)

Tell me in the comments — Graph or Lines?
Who else misses Micro planners? I found this under Who else misses Micro planners? I found this under a stack of papers. Don’t know how long it’s been chillin under there but I’m going to start using it. Great for quick notes and things you need to dump but don’t need long term.
Field research, planner style. Since the Coach no Field research, planner style.

Since the Coach notebooks are sold out, I grabbed this leather cover on Amazon to test the fit.
Good news: it fits beautifully (and it’s roomy enough for tabs).

Bad news?
I got excited and didn’t read the whole listing.

No snap.
No elastic.
Just vibes.

Luckily I’ve got elastic on hand… but consider this your reminder from someone who learned the hard way:

Read the full listing, friends.

#plannerlife #plannercommunity #a5planner #plannerfinds #citygirlplanners
Sometimes the best combinations aren’t planned… they just happen.

The Aquarelle Sky cover paired with Candy Rush tabs turned out to be one of those moments. The colors line up so perfectly, it looks like they were made for each other.

Just a little unexpected color magic.
Every tab is placed by hand. Nothing here is auto Every tab is placed by hand.

Nothing here is automated. We print, cut, laminate, punch, and assemble every order ourselves.

When you shop with us, two real humans have touched every single piece.

#smallbusinesslife #madebyhand #behindthescenes #plannercommunity  #shopsmallbusiness
Does anyone else suddenly become a pink-and-purple Does anyone else suddenly become a pink-and-purple person in February…
or is it just me?

I don’t even fight it anymore.
February = soft colors, cozy plans, and a planner that matches the mood. 💕

#februaryvibes #plannercommunity #pinkplanner #plannerlove #citygirlplanners
Behind the scenes at CityGirl Planners. No factor Behind the scenes at CityGirl Planners.

No factories.
No automation.
Just Chris, a laminator, and a whole lot of patience.

Every tab you flip?
Hand-fed. Hand-finished. Hand-checked.

Small business life isn’t glamorous… but it is made with care.

#citygirlplanners #smallbusinesslife #plannercommunity #behindthescenes #plannerlove
Botanical Notes are officially live 🌿 I was ab Botanical Notes are officially live 🌿

I was able to scale them all the way down to Pocket Size, so they’re now available in every size we offer: Pocket, Personal, Half Size, A5, and Classic.

Same clean layout, same calm vibe, just more size options.

#plannercommunity #citygirlplanners #stationerylove #plannerrefills #citygirlplans
Fueling the Plan cover ☕✨ Because big ideas do Fueling the Plan cover ☕✨
Because big ideas don’t happen without caffeine, cute stationery, and a plan that actually gets written down. Spiral-bound, 6 x 8, and ready to live in your bag, your desk, or your favorite coffee shop booth.

This one’s for the list-makers, dream-chasers, and “one more coffee then I’ll start” crowd. 💅📓

#FuelingThePlan #SpiralNotebook #PlannerGirl #CityGirlPlanners #CoffeeAndPlans
Follow Us!

Categories

Archives

Copyright © 2026 · HappyCardFactory Designs